

How To Adjust The Back Up Camera On A Malibu Lsv
There's a number of reasons you might need to accommodate the angle on your backup camera. Perchance the angle at which the photographic camera is set is non to your preference, or mayhap the camera was not installed properly to begin with. For the latter, making certain the bending was right when the camera was installed is a skilful idea, only maybe you changed your mind subsequently, or someone else who owned the motorcar had a dissimilar preference and yous want to accommodate the angle of the photographic camera to fit your preference.
Regardless, we'll take you through common reasons and warning signs to suit the angle of your fill-in camera, as well as making certain that yous accept the right tools and equipment to do and so. In the event that information technology's time to upgrade your fill-in camera, we tin help with that too, since we are the backup camera experts. Start browsing our inventory or check out our blog for helpful resource .
Reasons to Suit Your Backup Photographic camera Angle
There are a number of reasons you ought to adjust your backup camera angle. Hither are the nigh common reasons:
- You tin see the license plate
- Y'all tin see the bumper
- Obstructed field of view
- Not plenty range of vision
- The camera is angled besides high and you can't run into the footing
- The camera is angled besides low so you lot don't see directly backside you
If any of these are the case, information technology's probably a good thought to accommodate the bending the camera is positioned at to maximize the driver's view when bankroll up a vehicle.
Tools & Preparation
First, we recommend getting a 2nd person to help with the adjustments. It'south much easier to have one person move the camera while the other watches the monitors and directs the adjustment. It tin too be done by walking back and forth between the camera and the display, but in that location's a higher risk for error when you do that.
Adjusting the backup camera will depend on the type of camera and how it is mounted. Some cameras are piece of cake to accommodate inside their casing, while others require tools to remove, adjust, and refasten. If you need to open the camera enclosure to remove and angle the camera, you'll demand the tools to exercise that.
If you demand to open the enclosure that has screws and bolts, you'll need a drill or hand screwdriver and the correct bits for the fasteners on the camera and its mount. Many mounts use hex screws or regular screws, so a drill or screwdriver is needed.
Possible tools needs to adjust the bending of a fill-in camera:
-
Flathead screwdriver
-
Phillips screwdriver
-
Cordless drill
-
3/32 to ⅛ drill bit
-
Washers, nuts, or grommets (preferably rubber to preclude damage)
How to Adjust Cameras with Unlike Mounts
Non all backup cameras and camera mounts are the same. Some cameras sit down inside an enclosure that is mounted to the vehicle, and can be adjusted within the enclosure. Some styles of mounts don't allow the removal of the enclosure and admission to the camera, preventing adjustments to the bending the lens points.
Adjust the Backup Photographic camera Lens Enclosure
Adjusting the angle of a backup camera can be as simple equally adjusting the angle of the lens within the enclosure, or adjusting the angle of the entire enclosure itself.
- Remove the camera enclosure from the mount by removing the screws.
- One time the enclosure is opened and the camera is free from the mount, you may adapt the angle of the lens and secure the enclosure back on to the mount to concur the camera in place.
Backup cameras with adjustable enclosures or lenses include:
License Plate Backup Photographic camera
This is a very easy type of camera to install and typically saves you from having to do modifications to your car's body to attach the camera. Other mounts typically require modifications to adhere them or drilling holes to mount the camera or its mounting frame. Its visibility range is based on where your license plate mounts are located.
For some automobiles (SUVs and other larger automobiles) the plate mountain point is higher assuasive for a wider view. Alternatively, some license plate mounts are closer to the road and may crave camera adjustments to become a skilful movie of what's behind you. You'll also have to be mindful of clearance.
Affluent Backup Camera
Affluent mount backup cameras are mounted to your vehicle past drilling a hole in the body of the motorcar and mounting the photographic camera. These cameras don't have as big of a viewing range as surface-mountain cameras, but they offer a surface-level view of the road, and the camera lens can exist angled to improve the view of the camera.
These cameras have the advantage of being pretty unobtrusive, even so, equally they'll simply be a small camera lens on the torso of the motorcar.
Snap-in Backup Camera
Snap-in mount backup cameras live up to their name. They come up with a drilling tool to create a pocket-sized pigsty in the machine'due south body, into which the camera tin can then be snapped into identify. Once the mount is installed, the camera is gear up into information technology in a way that allows you to adjust it while mounted.
If you don't want to add a bigger mount, and want a camera that blends into your vehicle with minimal modification and external parts, this is a good choice. Snap-in mounts are pretty secure as well, and they're not too circuitous to install and suit, every bit long as you're comfy drilling a few small holes. They're a lot like flush-mounts but tend to be smaller and more lightweight due to their design.
Other cameras don't allow access to the photographic camera inside the enclosure, so how are you supposed to angle the camera if you can't get to it? You angle the mount!
How to Adjust Angle of Fill-in Camera Mounts
Not every backup camera has an adaptable lens or enclosure. This means adjusting the angle of the camera includes adjusting the entire mount.
Just remove the mount from the vehicle and place washers, bolts, or grommets between the mount and the surface of the vehicle and refasten the screws or bolts. The positioning of the grommets or other hardware volition determine how the mountain sits and therefore the bending of the camera.
Alternatively, you might have a trouble with the hole that the camera is seated in. If that's the case, simply drill a new one, insert the grommet, and feed the camera and its wiring through. You may have to cut the wire connections on the camera and splice them dorsum together. Usually this can exist accessed through the trunk.
How to Adjust the Angle: License Plate Mountain
One of the more mutual mounting solutions, the license plate mount comes in 2 forms:
- There are ones that fit into the existing license plate frame— the universal bracket backup photographic camera mounts that tin can be easily mounted to a license plate or another area of the vehicle.
- The license plate frame mount, which replaces the existing license plate frame.
Some license plate mounts have adaptable photographic camera lenses or enclosures, and some don't, requiring the addition of grommets or washers to tilt the mount. Both forms of this type of camera mount adhere to the existing mounting screws that are used to mount your license plate.

On a license plate frame mount, if you need to but adapt the camera viewing angle up a little college, you add together a couple grommets or washers on the lower installation screws between the vehicle and the mounting bracket to get the bracket to angle back. This should push the bottom of the bracket out which will cause the viewing angle of the camera to come up a little higher.

The bracket mount could possibly be harder to bending with washers, because the holes where the screws fasten are closer together, so the bending of the tilt is less dramatic.
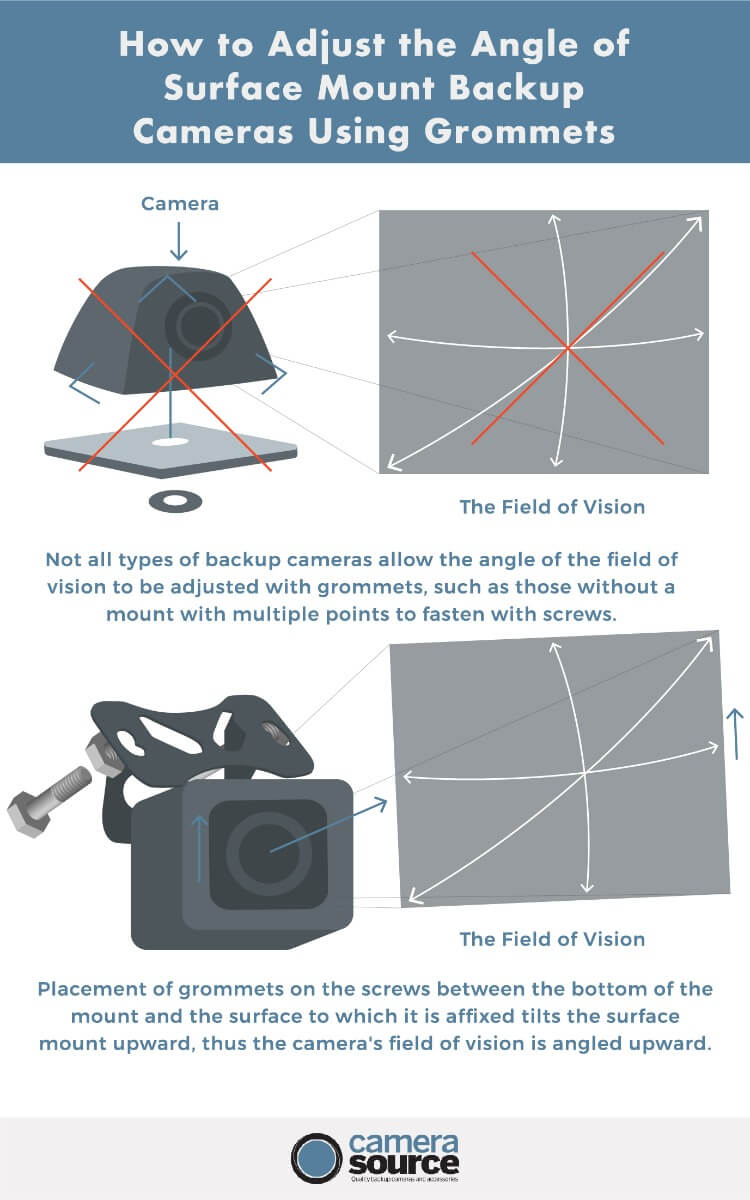
How to Adjust the Angle: Surface-Mount
The surface-mountain mode photographic camera is ordinarily self-contained in its own casing. They're easy to install and adjust considering they come up with their own mounting brackets and prepare of instructions.
Depending on the specific fashion, there are a few means to go about adjusting it:
- Placing washers or on the screws between the surface and the mount
- Opening the enclosure and moving the camera inside it
- Unfastening the enclosure and moving it, and therefore the camera as well
Unfortunately, not every surface mount fill-in photographic camera is able to be adjusted with these methods. Some mounts don't have the multiple spiral holes in the right places to exist able to tilt it with grommets. If this is the case, and If the camera is not adjustable inside the enclosure, it may require existence removed and reinstalled to arrange the angle.
Install these cameras relatively high on the vehicle for the optimal viewing angle. This type of photographic camera is best for SUVs, Jeeps, and hatchbacks. With a larger automobile, the camera should be mounted atop the hatch, and with a smaller vehicle you want to put it in right below the license plate light housing.
Should you remove and reinstall the photographic camera? Cameras that may not exist adjustable without removal and reinstallation.
Depending on the fashion and the installation location on the vehicle, these may or may not require removing them and reinstalling them at a different angle or location.
Lip Mounted
Lip mounted cameras are for that OEM look, and many different vehicles support them or take the mounting ability already.
Vehicle Specific
Sometimes you just desire to replace the existing backup camera on your vehicle, which means finding something that's specific to the brand and model.
OEM-Mount
The Original Equipment Manufacturer (OEM) mount is usually present thanks to vehicle manufacturers putting the fill-in camera on your vehicle, and they're frequently incorporated into your vehicle's trim. If your car doesn't have a manufacturing plant-installed camera, you can often install an aftermarket one that has the exact same advent equally an OEM model.
An aftermarket camera is the preferred method, as information technology not simply looks factory installed, but it typically provides a better view of your surroundings because it is placed in an ideal location on the vehicle. When you buy an OEM kit, it'll have the instructions, as well as actual OEM components like emblems, handle assemblies, or light fixtures along with the camera itself.
Drilled Mount
Drilled mounts are fastened to a vehicle by drilling holes upon which you can mount the subclass. They are extremely sturdy and give a solid base to put your camera in, and tin also be mounted in unusual locations likewise. If yous have to stick them to the side of an RV or trailer y'all tin practice that equally well.
They practice take the disadvantage of forcing y'all to drill holes in your auto body, but that shouldn't be a trouble for most people. Merely make sure to position the camera properly earlier drilling! You can't undo damage without a lot of extra work.
Butterfly Mount
Butterfly mounts are an excellent choice for mounting to a car's underside or bumper, or even some other function of the undercarriage. If your vehicle is higher up off the ground, a butterfly mount gives a great bending for your rearview photographic camera.
They're also very useful if they're fastened to an RV or a trailer. You don't have to drill into annihilation either, and they come in long and short designs to ensure that you lot can attach them to the proper pressure level points on the vehicle, which volition requite you ample back up and space for attaching them.
Practice you need to replace your fill-in camera?
If yous're having trouble with a camera installation or aligning, our experts can aid . At Camera Source, we pride ourselves on knowing the ins and outs of photographic camera installation and repair. If you need a new camera or a replacement, browse our inventory , we'll take what you need.
Source: https://camerasource.com/blog/how-to-adjust-the-angle-of-a-backup-camera/
Posted by: herreratarin1976.blogspot.com
0 Response to "How To Adjust The Back Up Camera On A Malibu Lsv"
Post a Comment